Monday, February 27, 2012

Savory Cheesecake with Chèvre and Gremolata for #baketogether

Savory Cheesecake with Chève and Gremolata

When an idea won’t go away, it’s time to preheat the oven. This Savory Cheesecake with Chévre and Gremolata is a recipe I could not get out of my head.

A ripple of gremolata (lemon, parsley, garlic) runs through the lemony filling, making a fine choice for first course or as a party appetizer.

A ripple runs through it: preserved lemon, sautéed garlic, parsley, and capers.


It’s my second cheesecake for Abby Dodge’s February #baketogether, the first being sweet, with pumpkin and blackberry flavors.

As I considered ways to adapt Abby’s original recipe, I wanted to use ingredients that I keep on hand so the recipe would become one that I could turn to without much effort. I kept thinking of that jar of preserved Meyer lemon and its lively citrus flavor and how nicely it would complement the tangy goat cheese.

And I thought of parsley for color and flavor. If we don’t have parsley on hand, things get ugly. It’s the primary component of a happy and healthy house rabbit’s diet. We go through a lot of parsley here.


Tuesday, February 21, 2012

TWD: Chocolate Truffle Tartlets

Chocolate Truffle Tartlets
Do not dismiss this as just another chocolate tart. It most definitely is not ordinary.

Today’s Tuesdays with Dorie recipe is from David Ogonowski. At first glance, I surmised that the truffle part of the name meant a ganache filling. Tasty enough, but common. I figured the little jibbles of amaretti and the chopped white and milk chocolates must be thrown in for amusing texture. But when I re-read the recipe, I saw there was no heavy cream, and therefore, no ganache.


What I hadn’t figured on were the egg yolks.

Eight of them, in fact, for a recipe that yields six tartlets. (That’s one and one-third egg yolk per tart, but I’m not counting.)


The egg yolks are beaten until very moussey. Into those airy yolks are folded melted butter and bittersweet chocolate. Actually what it reminded me of was the pre-freezer Chocolate Ice Cream St. John (aka Five Day Ice Cream) with its rich quantity of eggs, chocolate and cream.

To the filling is added bits of amaretti or biscotti. (I made my own amaretti by using the leftover egg white from the chocolate dough.) Next go the chopped pieces of white and milk chocolates. Fill the chocolate tart shells and pop into the oven to set the yolks.

Each tart is like a chocolate cookie wrapped around a delicate brownie — and I say brownie even though there is not one smidgen of flour in the filling. Wonderful texture. Enjoy one when it is slightly warm because the bits of chopped chocolate are soft and melty. A touch of coffee ice cream or crème anglaise wouldn’t hurt.

These extraordinary tartlets are from the book Baking with Julia. You’ll find the recipes at the blogs of our hosts Jaime of Good Eats and Sweet Treats, and Jessica of Cookbookhabit.


Sunday, February 19, 2012

Pumpkin Cheesecake + Blackberry Sauce for #baketogether

Pumpkin Cheesecake with Seedless Blackberry Sauce

Cheesecake figures prominently in several of my food memories, yet I had never baked one until this Abby Dodge #baketogether event.

There was the First Cheesecake. The one topped with bright red cherry pie filling. It was the ’70s, and my much older sister had come home from Southern California where she and her husband were living. For us in the land of pound cake and fried peach pies, this dessert was an exciting addition to the table. I liked it better than the spinach and artichoke casserole she also introduced (though I came to love cream cheese and spinach piled atop artichoke bottoms).

There was the Cheesecake Incident. As popular as cherry cheesecake became in our family, it was never baked by us, only by my sister when she came to visit. It was the next year that my sister’s husband dropped an entire cake whilst retrieving it from the refrigerator. Destroyed on the floor, shattered glass and all. 


Now my late brother-in-law was a uniformly happy man with an appetite for good food and conversation. He could rake up kinfolk with nearly anyone, including state troopers who stopped him for speeding. But we never let him forget the loss of that cheesecake. He just chuckled.

Years later, I moved to the Midwest and landed a freelance gig writing restaurant reviews for a city magazine. I co-wrote those reviews with the man I eventually married. For our small nontraditional wedding, an artist friend made two beautiful cheesecakes — one chocolate, one vanilla — and covered them with fresh flowers.

We’d not been married two full years when we moved to another state. I resumed writing restaurant reviews, but this time on my own, covering a large area for a regional business newspaper. At some point, cheesecake had became the darling of restaurants large and small. They appeared in an assortment of flavors. Please, not another cheesecake.

Spurning restaurant cheesecakes, I sought house-made desserts, which were increasingly rare. Many establishments outsourced sweet offerings to restaurant suppliers. It was not uncommon to meet the same raspberry cheesecake and the same soggy-bottomed apple pie with undercooked fruit at more than one restaurant.


When Abby posted her Vanilla Bean Cheesecake for February’s #baketogether, I realized it was high time I made my own. I chose pumpkin because it’s a crowd favorite. Who doesn’t like pumpkin cheesecake?

Blackberries are added for good looks as well as taste. Though luscious eaten fresh, they taste more complex when sweetened and heated. I wanted a thick sauce to stay in place and not drip all over the place when the cake was sliced. To reach this, I cooked the mixture slowly to concentrate the flavor, nearly reaching the jelly stage.


Pumpkin and blackberries. My Cheesecake.

  Pumpkin Cheesecake with Blackberry Sauce
adapted from Abby Dodge


For the crust:
2 cups (9 ounces) finely crushed graham cracker crumbs
3 tablespoons granulated sugar
3/4 teaspoon ground cinnamon
6 tablespoons (3 ounces) unsalted butter, melted

For the filling:
3 packages (8 ounces each) cream cheese, at room temperature
2 tablespoons all purpose flour
Good pinch of  table salt
1 1/3 cups (9 3/8 ounces) granulated sugar
3/4 cup canned pumpkin puree, at room temperature
Seeds scraped from 3  large vanilla beans or 4 teaspoons pure vanilla extract or paste
4 large eggs, at room temperature
1 teaspoon cinnamon
1/2 teaspoon ground nutmeg
1/2 teaspoon ground allspice
1/2 teaspoon ground cloves
1/2 teaspoon ground ginger

For the sauce
12 ounces fresh or frozen blackberries
8 ounces granulated sugar
extra berries for garnish


To make the crust:
1. Heat the oven to 375°F. Wrap the bottom of a 9-inch springform pan with a piece of aluminum foil and clasp the outer ring over the foil so the edges hang outside the ring. In a medium bowl, stir together the cookie crumbs, sugar, and cinnamon until well blended. Drizzle with the melted butter and mix until well blended.
2. Dump the crumbs into the springform pan and cover with large piece of plastic wrap. Place your hands on the plastic wrap and press the crumbs about 2 1/2 inches up the sides of the pan. With the plastic wrap still in place, redistribute the remaining crumbs evenly over the bottom of the pan and firmly press down to make a compact layer. As Abby suggested, I used a metal measuring cup with straight sides and a flat bottom for this task. Bake until the crumbs are fragrant, about 12 minutes and set on a rack to cool.
Reduce the oven temperature to 300°F.
To make the filling:
1. In a stand mixer fitted with the paddle attachment, beat cream cheese, flour and salt until very smooth with no lumps. Stop and scrape the beater and sides of the bowl frequently throughout this process to make sure the filling has lumps. Add the sugar, sour cream, spices and vanilla seeds or extract and beat until well blended and smooth. Add the eggs, one at a time, and beat until just blended, (Don’t over beat the filling once the eggs have been added or the cheesecake will puff too much.) Tap the bowl several times on the counter to release some of the air bubbles. Pour the filling into the cooled crust. Use a knife tip or a toothpick to pop any air bubbles on the surface.
2. Bake at 300°F until the center jiggles like jello when nudged, 63 to 68 minutes. The cake will be slightly puffed around the edges and the center will still look moist. Set on a rack and cool completely. Cover and refrigerate until well chilled, at least 8 hours or overnight or up to 3 days. The cake can also be frozen up to 1 month.
To make the sauce:
1. Place blackberries and sugar in a small-to-medium-sized heavy bottomed saucepan. Turn the heat to medium. Using a potato masher, crush the berries. As they heat, the berries will begin to release all their juices. Reduce heat to medium low and simmer gently for 15 minutes, stirring frequently with a wooden spoon. Remove from heat and allow to cool slightly. Place berries in a food mill or in a wire mesh strainer and allow all the juices to drip into a bowl. If using a mesh strainer, press on the berry pulp to release more of the  juices. (Discard this berry pulp or put it outside for the birds to enjoy.)
2. Rinse out the saucepan you just used. Place the blackberry juice back into this saucepan and bring to a very gentle simmer on low heat. Cook slowly, stirring often with a whisk, until the sauce is thickened, about 30 to 45 minutes, being very careful that it does not scorch. Remove from heat and allow to cool to room temperature.
To serve:
Have a flat serving plate ready and close by. Unclasp the pan’s ring, remove it, and using the excess foil, gently nudge and lift the cake to be sure it’s released. Using the foil, carefully lift the cheesecake and slide it onto the serving plate and center it. Tear off one side of the foil close to the cheese cake. On the opposite side of the cake, gently pull the remaining foil  out from the cheesecake. Pour the blackberry syrup in the middle of the cake. Using the back of a spoon, swirl in a circular motion until all or most of the surface is covered. (For contrast, I left a small border of cheesecake showing around the edges.) Place fresh berries in the middle of the cake and/or along the sides. To serve, run a thin knife under hot water, wipe it dry, and cut the cake into slices, heating and wiping the knife after every slice.

Wednesday, February 15, 2012

A Recipe for Candied Citrus Peel


Candied Orange Peel
For some reason, making candied citrus peel has always felt a bit mysterious to me. Maybe it’s the slight trepidation of sugar syrups and thermometers. Mostly, though, I perceived that I never had enough time to make it. What I discovered is that it’s neither fussy nor time consuming.

If you purchase organic citrus, then you know the sizable price difference from conventional fruit. Making candy from the leftover peel becomes a sweet little bonus.


You can use the candy in a myriad of ways, though it’s nice simply for nibbling with a cup of tea or espresso. It can be added to baked goods — such as the rolls I made for January #baketogether — or for fruitcake, cookies, and pannetone. Diced into confetti, it makes a pretty garnish. Candied peel is fabulous dipped in dark chocolate, but then what isn’t good with a chocolate coating?

Recipes abound in books and online. Here’s one from Deborah Madison. In Local Flavors she  recommends this recipe for anyone who seems pressed for time because the cooking process can be interrupted if need be.


Candied Citrus Peel for Busy People
Adapted from Local Flavors by Deborah Madison

Orange is a classic choice, but other varieties of citrus work well, too, such as grapefruit or pummelo. I loosely followed this recipe, omitting the sugar coating and forgetting the corn syrup.


Peels from 2 organic grapefruit, 3 organic oranges or 1 pummelo
1 1/2 cups sugar
1/4 cup light cornsyrup
1 cup superfine sugar for coating

Put the peels in a heavy bottomed saucepan and cover with water. Bring to a boil for one minute. Drain the peel then cover with more water. Place a heavy plate on top of the peel to keep it submerged. Bring to a boil, then lower the heat and simmer for 30 minutes. Leave the peels in the water until it has cooled (or overnight). Using a sharp knife, carefully remove the white pith from peel.

Place sugar, corn syrup and water in a heavy bottomed saucepan. Bring to a boil, then add the peel. Cook slowly until the peel looks translucent and the liquid has almost boiled away (about 1 hour). (At any time during this process, you can turn off the heat and just let the peels soak in the syrup.) Transfer the peel to a rack set over a tray to catch any drips.

Toss a few pieces of peel in the sugar, then put them on a rack to dry for one hour. Pack in a container between pieces of waxed paper. Store in the refrigerator.


Friday, February 10, 2012

Recipe for Greens, Beans, and Turnip Stew


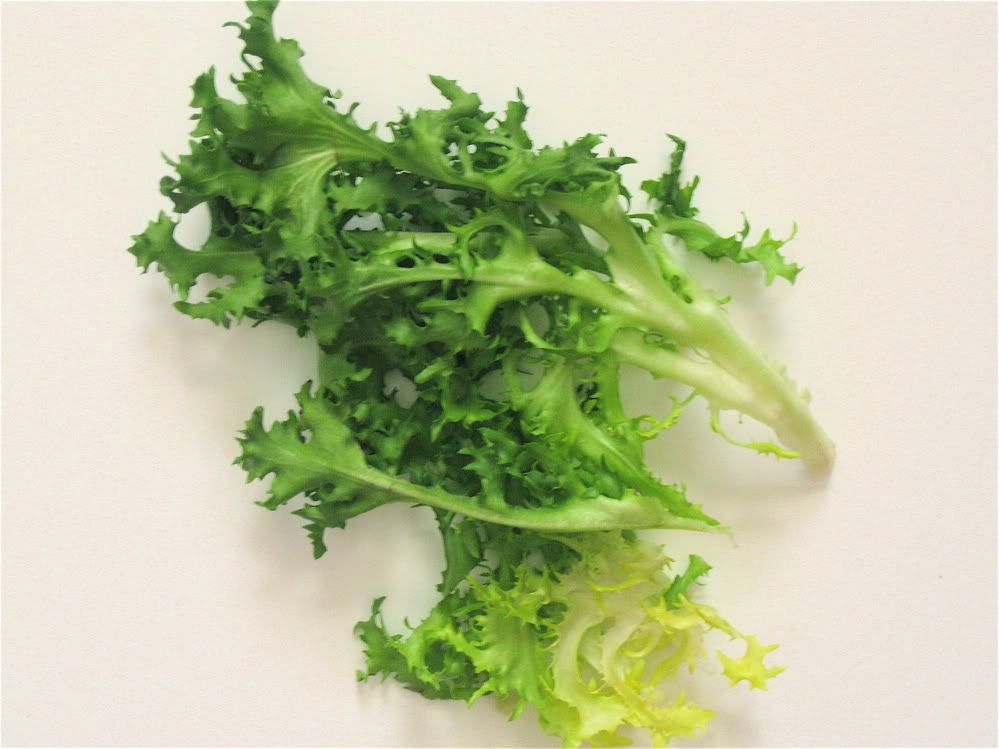
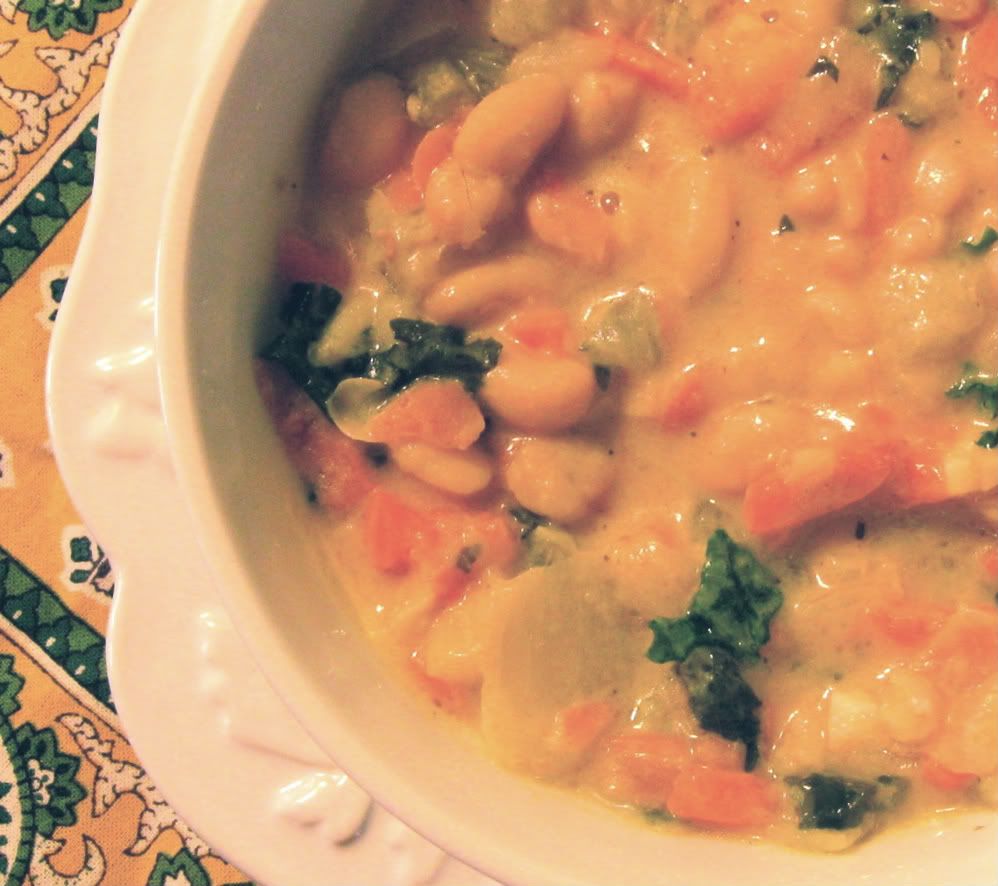
Curly endive join white beans and turnips in a hearty stew.

As we tucked into a stew of Greens, Beans and Turnips, my husband told me that beans are one of the primary foodstuffs of Blue Zones.

Blue Zones are places in the world where people live longer, healthier lives. He learned that when Blue Zones author Dan Buettner spoke at the Iowa City Chamber of Commerce. The State of Iowa has committed to participate in a project to improve overall health. Cedar Rapids was just named one of 11 finalists for Blue Zone demonstration sites.


“Beans. Well that’s good.” (We eat a lot of beans.) “What else?” I asked.

“Oh, it’s what you’d expect: nuts, wine.” He couldn’t remember the rest, but I was feeling healthier already.

Greens, Beans and Turnip Stew
We like beans — which is a good thing as we are a mostly vegetarian household. My husband is more so than I am. Oh, there are the occasional duck legs for him in France, and sometimes I come home with hamburger on my breath.

The stew we enjoyed that night can be vegetarian if you swap out  chicken broth and use vegetable instead. The recipe is from a fellow Iowan down the road in Des Moines, Wini Maranville, food editor at the Des Moines Register. It’s from The Bonne Femme Cookbook published in 2011. I enjoy her blog, Chez Bonne Femme, which is full of recipes and observations about France.

Wini has spent many years in France and this book represents the “fresh, honest, and simple” everyday French cusine.

The term bonne femme means “good wife.” And how would a good wife cook? She’d be frugal rather than extravagant, she’d think seasonally, using her intuition, improvising as necessary.

Wini writes that this style of cooking is called bonne femme no matter who is in the kitchen, husband or significant other.

Recipes are organized by category (beverages, soups, salads, meats, etc). Wini writes colorful and fact-filled introductions for each recipe, setting the stage for its place in French life.

I look forward to trying many dishes from the book, but I chose this hearty stew first because of the turnips. It’s not too far from the white bean and greens soup that I often make, but I don’t use turnips. I actually prefer turnips raw, but I liked the gentle sweetness they gave this dish.

Chickory (curly endive) is one of my favorite greens. I add it to white beans or chickpeas in soup but my favorite way is as a side dish, sautéed with olive oil, garlic and red pepper flakes.

Marjoram seasons this stew. It is an herb I never use, but will from now on.

It’s those shredded carrots that give a clever French touch. The obvious choice is to slice or chop the carrots, but when shredded they fill up the nooks and crannies of the dish, settling in between the larger white beans and turnip chunks. The stew is finished with a bit of sour cream, which brings everything together.

Score one dish for the Blue Zone.

Greens, Beans, and Turnip Stew
adapted from The Bonne Femme Cookbook

2 T extra-virgin olive oil
1 c chopped onion
1/2 c sliced celery
1 c shredded carrots
3 garlic cloves, minced
4 c vegetable or chicken broth, home-made or low sodium
1 t dried marjoram, crushed
2 medium-sized turnips cut into 1-inch chunks
2 (15-oz) cans Great Northern beans, drained and rinsed
2 c shredded chickory (curly endive) or escarole
1/2 c light or regular sour cream

Begin by sautéing onion and celery in a large heavy pot. Cook until vegetables are tender but now brown. Add the carrots and garlic; stir and cook for 30 seconds more. Add the broth. Stir in marjoram and turnips. Bring to a boil. Reduce heat and cover. Let simmer until the turnips are tender, about 15 minutes.

Place 3/4 cup of the beans and about 1/4 liquid from the soup in a food processor. Process to a smooth pureé. (I didn't want to wash any more dishes, so I used an old wooden potato masher in a small bowl). Add this mixture, plus the remaining beans, to the soup. Bring to a boil.

Add chickory to the soup and heat until the greens are slightly wilted. Don’t overcook because you want the greens to retain their bright color. Add sour cream and heat gently, but not to boiling. Remove from heat and serve at once.

Tuesday, February 7, 2012

TWD: Baking with Julia - White Loaves

White Loaf for TWD: Baking with Julia
I’m so happy to be joining Tuesdays with Dorie. In the new series some 300 bloggers will explore Baking with Julia, the companion book to Julia Child’s PBS television program that featured guest bakers and their recipes. The book is Dorie Greenspan’s baby in that she wrote introductions to each recipe and edited the entire collection.

We begin with a simple loaf of white bread from chef Craig Kominiak. This is not a flimsy, soft white pillow. It is a sturdy yet tender crumb surrounded by a toothsome crust. A real loaf of bread. We loved it toasted with scrambled eggs piled on top, and it was just right alongside a hearty soup. My husband recommends it with peanut butter.

This is an entirely manageable recipe for busy people. You can prepare and bake this bread all in the span of a few hours. Start at breakfast, have it for lunch. Start at lunch, have it for teatime or supper. Start when you get home from work and it’s done by bedtime. The next morning you have toast for breakfast.

I’ve made the recipe twice already. Once mixed, the dough needs a 45-minute rise. Then you just punch it down, roll into shape and nestle into a buttered loaf pan. Let it rise for another 45 minutes or so. Bake for 35 to 45 minutes and you’re done. Then wait patiently for your reward.

If you’ve always wanted to make your own basic loaf of white bread, now’s a good time to begin. Take a look at the recipe on the blogs of today’s hosts, Laurie at slush and Jules at Someone’s in the Kitchen.


Related Posts Plugin for WordPress, Blogger...