|
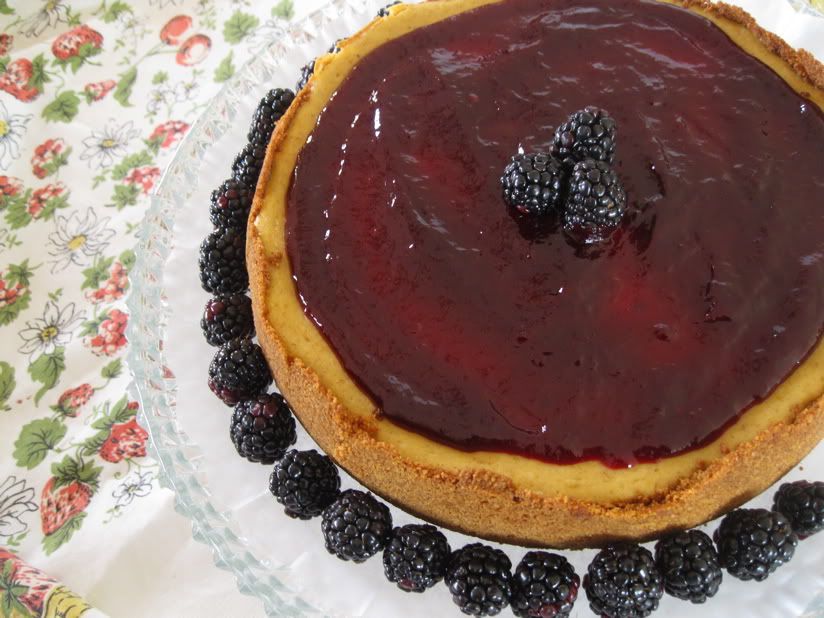
| Pumpkin Cheesecake with Seedless Blackberry Sauce |
Cheesecake figures prominently in several of my food memories, yet I had never baked one until this Abby Dodge #baketogether event.
There was the First Cheesecake. The one topped with bright red cherry pie filling. It was the ’70s, and my much older sister had come home from Southern California where she and her husband were living. For us in the land of pound cake and fried peach pies, this dessert was an exciting addition to the table. I liked it better than the spinach and artichoke casserole she also introduced (though I came to love cream cheese and spinach piled atop artichoke bottoms).
There was the Cheesecake Incident. As popular as cherry cheesecake became in our family, it was never baked by us, only by my sister when she came to visit. It was the next year that my sister’s husband dropped an entire cake whilst retrieving it from the refrigerator. Destroyed on the floor, shattered glass and all.
Now my late brother-in-law was a uniformly happy man with an appetite for good food and conversation. He could rake up kinfolk with nearly anyone, including state troopers who stopped him for speeding. But we never let him forget the loss of that cheesecake. He just chuckled.
Years later, I moved to the Midwest and landed a freelance gig writing restaurant reviews for a city magazine. I co-wrote those reviews with the man I eventually married. For our small nontraditional wedding, an artist friend made two beautiful cheesecakes — one chocolate, one vanilla — and covered them with fresh flowers.
We’d not been married two full years when we moved to another state. I resumed writing restaurant reviews, but this time on my own, covering a large area for a regional business newspaper. At some point, cheesecake had became the darling of restaurants large and small. They appeared in an assortment of flavors. Please, not another cheesecake.
Spurning restaurant cheesecakes, I sought house-made desserts, which were increasingly rare. Many establishments outsourced sweet offerings to restaurant suppliers. It was not uncommon to meet the same raspberry cheesecake and the same soggy-bottomed apple pie with undercooked fruit at more than one restaurant.
When Abby posted her Vanilla Bean Cheesecake for February’s #baketogether, I realized it was high time I made my own. I chose pumpkin because it’s a crowd favorite. Who doesn’t like pumpkin cheesecake?
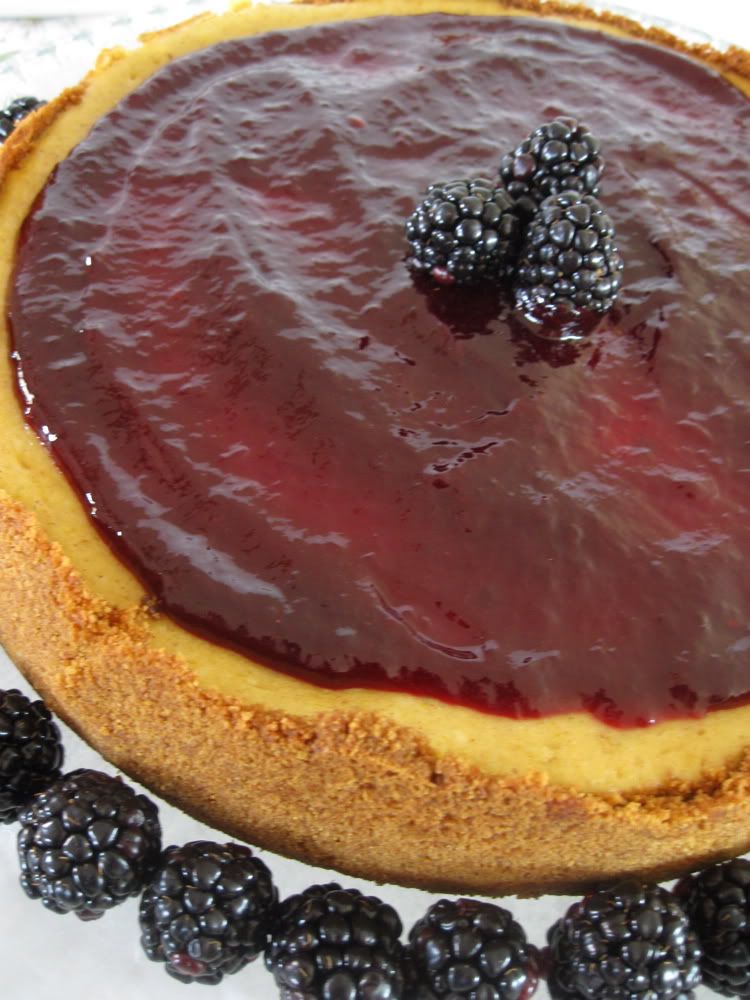
Blackberries are added for good looks as well as taste. Though luscious eaten fresh, they taste more complex when sweetened and heated. I wanted a thick sauce to stay in place and not drip all over the place when the cake was sliced. To reach this, I cooked the mixture slowly to concentrate the flavor, nearly reaching the jelly stage.
Pumpkin and blackberries. My Cheesecake.
Pumpkin Cheesecake with Blackberry Sauce
For the crust:
2 cups (9 ounces) finely crushed graham cracker crumbs
3 tablespoons granulated sugar
3/4 teaspoon ground cinnamon
6 tablespoons (3 ounces) unsalted butter, melted
For the filling:
3 packages (8 ounces each) cream cheese, at room temperature
2 tablespoons all purpose flour
Good pinch of table salt
1 1/3 cups (9 3/8 ounces) granulated sugar
3/4 cup canned pumpkin puree, at room temperature
Seeds scraped from 3 large vanilla beans or 4 teaspoons pure vanilla extract or paste
4 large eggs, at room temperature
1 teaspoon cinnamon
1/2 teaspoon ground nutmeg
1/2 teaspoon ground allspice
1/2 teaspoon ground cloves
1/2 teaspoon ground ginger
For the sauce
12 ounces fresh or frozen blackberries
8 ounces granulated sugar
extra berries for garnish
To make the crust:
1. Heat the oven to 375°F. Wrap the bottom of a 9-inch springform pan
with a piece of aluminum foil and clasp the outer ring over the foil so
the edges hang outside the ring. In a medium bowl, stir together the
cookie crumbs, sugar, and cinnamon until well blended. Drizzle with the
melted butter and mix until well blended.
2. Dump the crumbs into the springform pan and cover with large piece
of plastic wrap. Place your hands on the plastic wrap and press the
crumbs about 2 1/2 inches up the sides of the pan. With the plastic wrap
still in place, redistribute the remaining crumbs evenly over the bottom
of the pan and firmly press down to make a compact layer.
As Abby suggested, I used
a metal measuring cup with straight sides and a flat bottom for this
task. Bake until the crumbs are fragrant, about 12 minutes and set on a
rack to cool.
Reduce the oven temperature to 300°F.
To make the filling:
1. In a stand mixer fitted with the paddle attachment, beat cream
cheese, flour and salt until very smooth with no lumps. Stop and
scrape the beater and sides of the bowl frequently throughout this process to make sure the filling has lumps. Add the sugar, sour
cream, spices and vanilla seeds or extract and beat until well blended and
smooth. Add the eggs,
one at a time, and beat until just blended, (Don’t over beat the filling once the
eggs have been added or the cheesecake will puff too much.) Tap the bowl
several times on the counter to release some of the air bubbles. Pour
the filling into the cooled crust. Use a knife tip or a toothpick to pop any air bubbles on the surface.
2
. Bake at 300°F until the center jiggles like jello
when nudged, 63 to 68 minutes. The cake will be slightly puffed around
the edges and the center will still look moist. Set on a rack and cool
completely. Cover and refrigerate until well chilled, at least 8 hours
or overnight or up to 3 days. The cake can also be frozen up to 1 month.
To make the sauce:
1. Place blackberries and sugar in a small-to-medium-sized heavy bottomed saucepan. Turn the heat to medium. Using a potato masher, crush the berries. As they heat, the berries will begin to release all their juices. Reduce heat to medium low and simmer gently for 15 minutes, stirring frequently with a wooden spoon. Remove from heat and allow to cool slightly. Place berries in a food mill or in a wire mesh strainer and allow all the juices to drip into a bowl. If using a mesh strainer, press on the berry pulp to release more of the juices.
(Discard this berry pulp or put it outside for the birds to enjoy.)
2. Rinse out the saucepan you just used. Place the blackberry juice back into this saucepan and bring to a very gentle simmer on low heat. Cook slowly, stirring often with a whisk, until the sauce is thickened, about 30 to 45 minutes, being very careful that it does not scorch. Remove from heat and allow to cool to room temperature.
To serve:
Have a flat serving plate ready and close by. Unclasp the pan’s ring,
remove it, and using the excess foil, gently nudge and lift the cake to
be sure it’s released. Using the foil, carefully lift the cheesecake and
slide it onto the serving plate and center it. Tear off one side of
the foil close to the cheese cake. On the opposite side of the cake,
gently pull the remaining foil out from the cheesecake. Pour the blackberry syrup in the middle of the cake. Using the back of a spoon, swirl in a circular motion until all or most of the surface is covered. (For contrast, I left a small border of cheesecake showing around the edges.) Place fresh berries in the middle of the cake and/or along the sides. To serve, run a thin knife
under hot water, wipe it dry, and cut the cake into slices, heating and
wiping the knife after every slice.