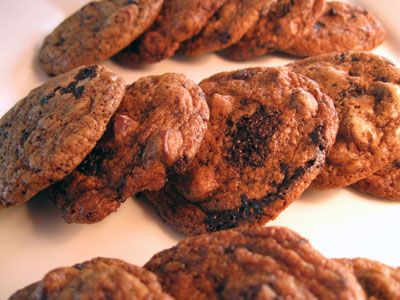
Tuesday, March 19, 2013

Mocha Chocolate Chip Cookies for Tuesdays with Dorie

Mocha Chip Cookies
A friend and I recently discussed whether she needed a big standing mixer. It’s eye candy for sure, and manages to launch all manner of baking daydreams.

For a long time, I had only a hand mixer, which I hesitated to use because it was stuck in a box in the corner on a very high shelf in the kitchen. A lot of work to take down and put away. So I mixed a lot of cakes by hand, which I rather enjoyed, because I could get in touch with the pioneer within and I could feel smart that I wasn’t using any electricity.

You can make cookies by hand, too, but sometimes a stiff cookie dough can benefit from a little horsepower. Especially the kind that operates on your kitchen counter while you stand back and watch. Take these Mocha Chocolate Chip cookies, for instance. The all-butter dough stayed thick in my chilly kitchen and would have been a beast to mix by hand. I was glad to let the mixer do the heavy lifting.

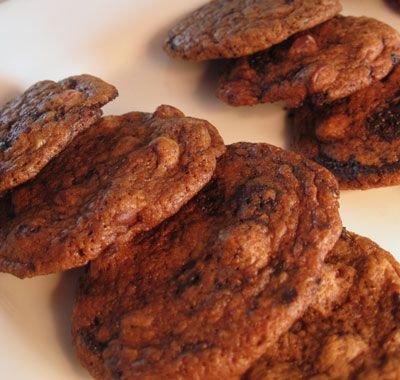
These cookies feature a coffee-flavored dough absolutely laden with bittersweet chocolate chips. Laden as in a full one pound of chocolate for 2 cups of flour. (Not complaining.) The coffee is not prominent for those who think they don’t like coffee. Rather, it serves as a layer to enhance the chocolate.

The recipe calls for dried apricots, which are optional and which I forgot anyway. I had an issue with the first batch because they turned out too thin for my liking. This is because the large organic eggs I used should have been marked as jumbo. I added about 1/3 cup more flour to the remaining dough and the rest turned out just right.

If you would like to try these cookies, the recipe is being hosted at Galettista. Stroll over to the Tuesdays with Dorie website where you’ll find links to all the participating bloggers.


Tuesday, March 5, 2013

Croissants for Tuesdays with Dorie

Croissants made from a recipe in Baking with Julia.

The first time I ever baked croissants created a bit of giddy delight, not unlike when you meet someone famous and you realize this famous person looks in real life just as he or she does on TV or in photographs. And even though the encounter is very real, you still can’t believe the two of you are standing there.

To think I’d made a pastry that seemed so elusive and unattainable was immensely satisfying. I had the same feeling this time round as I baked croissants for Tuesdays with Dorie.

I used two rolling pins for this project.

I wouldn’t call the recipe particularly complicated. It just involves some time and planning — the repeated rolling and folding over several installments. I prepared the dough on Friday afternoon, resumed Saturday night and finished on Sunday. If you’ve ever made puff pastry from scratch, the process of turning and folding and rolling will be familiar. There’s no other way to create those butter laden layers of goodness.

Croissants also require elbow grease and I have great admiration for professional bakers who make them by hand every single day. Rolling the dough took effort, and I was a bit sore in my trapezius muscles. But that’s OK, because any calories burned in preparing croissants will quickly be erased when eating them.

A little word on rolling pins: I love my wooden French style pin because it’s lightweight and simple. It was perfect for whacking the dough in stage one, when the slab of butter is first enclosed with dough and you need to flatten the package. For rolling, however, German engineering wins every time. My stainless steel pin is heavy and, because it’s stainless steel, remains a bit on the cool side. The heft is what you need for extending an 8 x 14 piece of dough into 14 x 24 dimensions. And you need some patience to realize that if you keep working at it, the dough will indeed submit.

Croissants ready for baking.

If you have always wanted to bake something as ambitious as croissants, do give it a try. Whatever it is, don’t be intimidated. Grab your rolling pin, follow the directions and you’ll be rewarded.

I’m one of many bloggers who are cooking their way through Baking with Julia as part of Tuesdays with Dorie. Get today’s croissant recipe at Amanda’s blog, Girl+Food=Love. Visit the TWD site to see links to the other participating bloggers.


Thursday, February 28, 2013

Vanilla Pots de Crème with Salted Coffee Caramel Sauce for #baketogether

Frozen Vanilla Pot de Crème with Salted Coffee Caramel Sauce

Never turn your back on pots de crème. Don't step into the living room to catch a few minutes of an English Premier League soccer game to see a winning goal scored in the 90th minute.

You’ll be distracted, remember the custards too late and have to start all over, as I did.

And because I started over and was now invested to the tune of 10 eggs and four pints of half-and-half, I decided not to risk another baking error. So I baked two custards (successfully) and froze the rest as ice cream, which tasted amazing. What I like about the custard itself is that it doesn’t call for very much sugar — just 1/4 cup per 12 ounces of half and half.

These lovely little custards are for the February #baketogether run by Abby Dodge. Pots de crèmes are velvety smooth and these are indeed rich with vanilla. As it turns out, I had used my last vanilla bean to make homemade vanilla extract, so instead of fishing out that vanilla bean infusing in vodka, I decided to use my newly made extract. While rummaging in the cabinets was delighted to find some little packets of vanilla sugar that I had brought home from France. These added an extra level of flavor
Traditional baked Pot de Crème with Salted Coffee Caramel Sauce.


Tuesday, February 19, 2013

Boca Negra for Tuesdays with Dorie

Lora Brody’s Boca Negra

I met Lora Brody, the author of today’s recipe, some 20 years ago in Columbus, OH. She was a visiting guest at La Belle Pomme Cooking School, a delightful place that was run by the food writer, author and recipe developer Betty Rosbottom (whose newspaper columns and  Bon Appetit features I have long enjoyed).

A chocolate-loving friend had shared her copy of Lora Brody’s book Growing Up on the Chocolate Diet: A Memoir with Recipes. Hers was the first food memoir I’d ever read and it was quite a revelation. And it was inspiring because I had begun writing about food for a local magazine. I loved and still enjoy Brody’s witty and honest reflections on family traditions, dinner party anxieties and chocolate.

At the book-signing, Brody asked what all I’d cooked and I told her how much I had enjoyed the Trianon, a hard-won recipe that she landed after many years of searching,  experimentation and networking. She responded approvingly and said, “Have you had the Black Beast? Make that.” She nodded as if dispensing secret code.

I did prepare the Bête Noire and it became a signature dessert, particularly among a certain group of friends. It was a flourless chocolate cake before flourless cake fame. This is Chocolate As Drug because — if you pay attention — you might feel a happy jolt to the brain after  the first bite. I frequently made this in the mornings before work — often before breakfast, even — so you can imagine the chocolate and caffeine rush from a few licks of the spoon.

The reason I’m telling you all this is that that the Black Beast is akin to the Boca Negra. The Boca Negra adds a smidgen of flour and substitutes bourbon for some of the water. Both recipes call for a fair amount of chocolate, which is probably why I get nervous when my chocolate supply dips below one couple pounds. This recipe was a pleasure to bake because it was like visiting an old friend.

Just to be different, I baked the Boca Negra in small ramekins rather than one large pan. The white chocolate ganache I prepared a little more thinly using half-and-half and drizzled it over the top of the cake.

If you’d like to see the recipe for  Boca Negra from the book Baking with Julia, hop over to today’s host, A Frederick Food Garden. To see what other Tuesday with Dorie bloggers have to say, visit here.


Tuesday, January 15, 2013

Cherry Pistachio Slice and Bake Cookies (Gluten Free) for #Baketogether

Cherry Pistachio Slice and Bake Cookies
I’m a bit late in posting this recipe for the December #Baketogether, but that’s how it has been lately in my neck of the woods. When I read Abby’s December recipe for Spicy Ginger Slice and Bake Cookies, my thoughts immediately came up with dried cherries and pistachios.

That’s because of a food memory that won’t go away. Years ago, I tasted a cherry pistachio cake while on a restaurant review. The bistro I visited was a shiny hopeful spot in a Michigan lake shore town that was climbing back from hard times. The bundt cake, with its drizzle of tartly sweet cherry sauce, was amazing. The restaurant has closed and the town still struggles, but that cake has not been forgotten. I probably should try to make one.

In addition to using dried cherries and roasted pistachios, I adapted Abby’s recipe by using a gluten-free flour. I’m not gluten-intolerant per se, but I do like baking with almond flour. I happened on this almond flour blend from Gluten Free Mama and decided to give it a try. It yielded a nicely crisp and slightly sandy textured cookie that my husband and I liked a lot.

Cherry Pistachio Slice and Bake Cookies
adapted from Abby Dodge

2 1/4 cups (10 1/8 ounces) all-purpose flour (I used an almond meal blend from Gluten Free Mama)

1/2 teaspoon baking powder

1/4 teaspoon table salt

12 tablespoons (6 ounces) unsalted butter, softened

1 cup (7 ounces) raw cane sugar

1 large egg, at room temperature

1/2 cup finely chopped dried cherries
1/2 cup chopped roasted pistachios
1/2 teaspoon vanilla extract
1/2 teaspoon almond extract

Whisk flour, baking powder and salt in a separate bowl until well blended. In a stand mixer fitted with the paddle attachment, beat the butter and sugar until smooth and creamy, about three minutes. Add the egg, chopped dried cherries, chopped pistachios, and vanilla and almond extracts, then beat on medium about one minute. Add the flour mixture and beat on low speed until the dough begins to form moist clumps.

Dump the dough onto a large piece of plastic wrap. Using the plastic as a guide, gently knead into a smooth dough. Shape into a 14-inch-long log, square or round, and wrap well in the plastic. Refrigerate until chilled and very firm, about 4 hours.

For baking, position an oven rack in the center of the oven, and preheat oven to 350°F. Depending on how many cookies you are baking, line or two baking sheets with parchment paper.

Using a thin-bladed sharp knife, cut the dough into slices between 1/8 and 1/4 inch thick. Arrange the slices about one inch apart on the prepared sheets. (If your cookies look uneven, reshape their sides with your hands. Press cookies lightly with the bottom of a glass to create smooth out the surface.)

Bake one sheet at a time until the tops look dry and the edges are golden brown, about 11 to 13 minutes. Move the sheet to a cooling rack and let the cookies sit for five minutes and then transfer them to a cooling rack and cool completely. Repeat with the remaining dough using cookie sheets that are completely cold.
Related Posts Plugin for WordPress, Blogger...